Plan Track Revise - Actuals Quick Guide
Extract from the original help guide
The following is a quick guide to entering and displaying actual time worked in the project viewer. You will need to be either a Manager or an Administrator to follow these steps.
Entering Actuals on the Timesheet
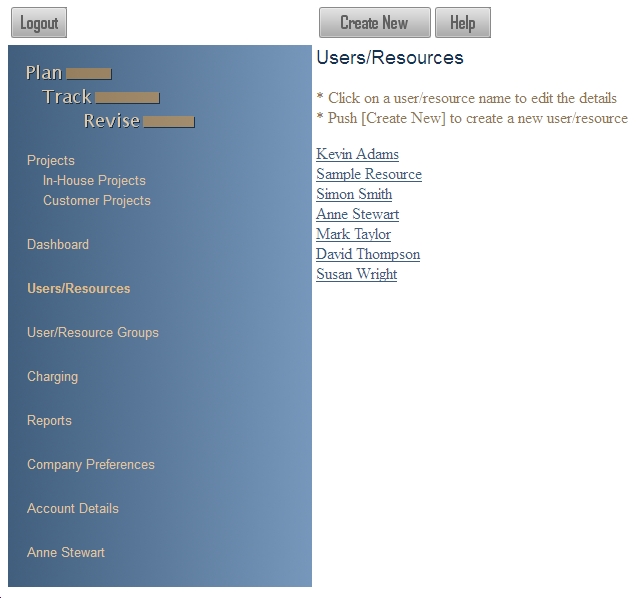
Login to the platform and select Users/Resources from the main menu. You will see a list of the users and resources that you are allowed to access.

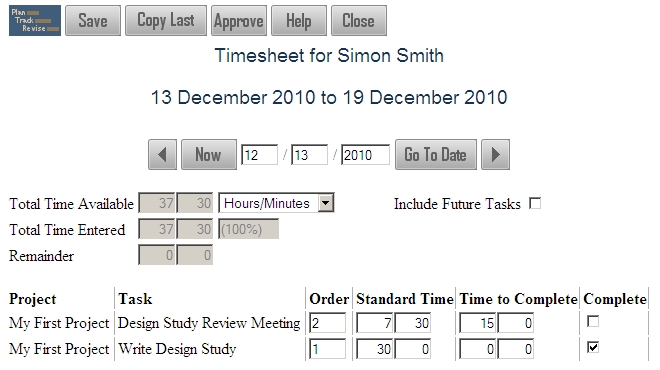
Select a user/resource by clicking on their name and then, in the User/Resource Details page push the [Launch Timesheet] button to launch their timesheet in a new window. Between the [Now] and [Go To Date] buttons you can enter the date of the timesheet that you need, and then push [Go To Date] to change to that timesheet.
If the user has completed their own timesheet then you will see the times that they have entered. You can also enter their times for them, or change what they have entered.

In the above example the user has spent 30 hours working on the "Write Design Study" task, which they have completed, and they have spent 7 hours 30 minutes working on "Design Study Review Meeting", for which they have estimated that there is an extra 15 hours left to complete.
The actual time worked will be viewable in the project viewer when the timesheet is approved. This can be done by pushing the [Approve] button. The time entry fields will become protected when the timesheet is approved.
The Timesheet window can be closed by pushing the [Close] button.
View Actuals in the Project Viewer
Launch the appropriate project by selecting the project folder on the main menu page and pushing the [Launch] button for it. Within the project viewer the blue bars will always represent the latest planned times, to see the actuals entered select "Actual 1" from the red bar drop down list.

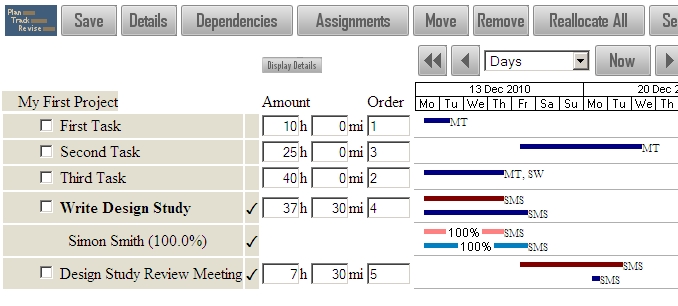
You will see that the actual time entered on the approved timesheet has been allocated in that period and can be seen as red bars on the Gantt chart. As the user marked "Write Design Study" as complete this is also indicated with the ✓ mark to the right of the task name.
If you hover your mouse over the task name, or red or blue bars, you will see that the actuals are now also included in the hintbox text.
Actuals for a Second Week
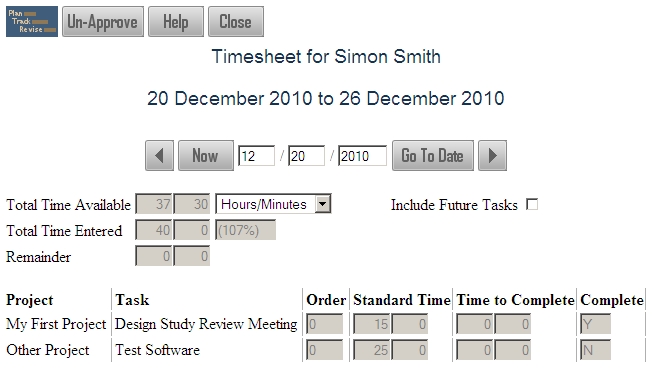
You can now return to the timesheet and enter some times for the following week, [Save] them and then [Approve] them. Notice below how we have entered more time than is available in the week. This will cause the actuals to be allocated at a 107% work rate.

By re-opening the project viewer you will see how this is incorporated into the plan. Select the "Design Study Review Meeting" task and then click on it a second time to see the breakdown of the assignments.

Notice how the breakdown shows the individual allocations made, whereas the task bars cover the entire length of the task. If you hover your mouse over the breakdown actual bars (the lighter red) the hintbox will display the work rate of each one. Where the allocation lasts for longer the work rate will be displayed within the bar, as for "Write Design Study" shown below.

This has been a quick guide to entering actuals and viewing them in the project viewer. At any stage more information can be found by pushing the [Help] button on a page.